
The security features of Zendit are designed to ensure the protection and confidentiality of your data and transactions. This document will guide you through the various security measures and best practices to effectively utilize these features.

When using zendit, there are a variety of security measures available. The more security features an account has enabled, the more secure the account will be. The features start with an API Key as the most basic level of security. By following these guidelines you can maintain the security of your account and help protect against fraudulent activity.

Every zendit account is assigned an API key for the test environment.
👋 This key must be included in the Authentication header of API requests made during testing.
Once your account is upgraded to the production environment, you will receive a separate production API key to access the API in your live environment.
API Keys are mandatory for accessing the API and are available in the zendit User Console for the account. Keep API Keys confidential and only share them securely.
If you suspect your key has been compromised, you can regenerate the key in the Zendit user console.
It is recommended to regenerate your production API Key on a regular schedule, maximum of 90 days. If your key has been accidentally exposed, regenerate the key immediately and redeploy the key in your production environment.
👉 When contacting support, do not include your API Key in any emails. zendit support engineers will never ask for the API Key to an account.
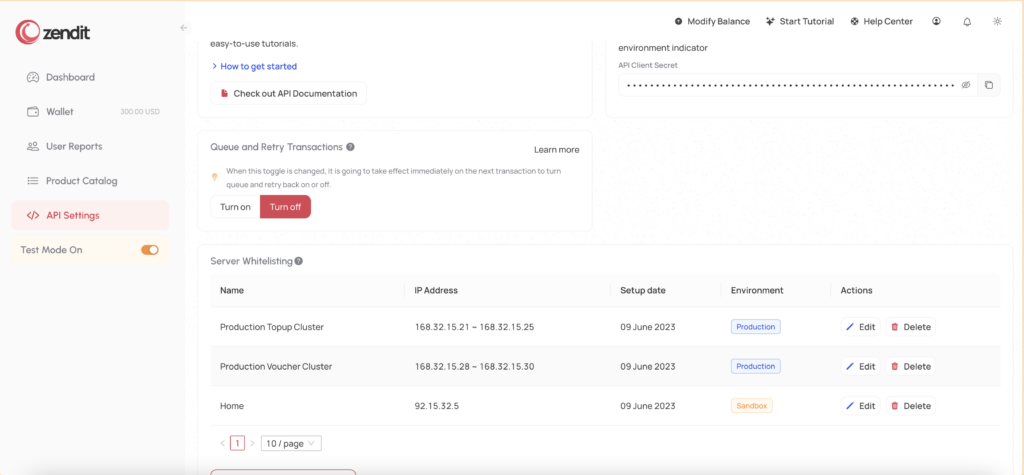
Zendit provides the option to enhance the security of your environment by setting up IP whitelists.
This feature allows you to specify trusted IP addresses that are granted access to your zendit account. Here are some important details regarding IP whitelists:
By setting up IP whitelists through the user console, you can strengthen the security of your zendit environment and ensure that only authorized IP addresses have access to your account.

When setting up a whitelist in zendit, you have the flexibility to enter individual IP addresses or define a range of sequential IP addresses.
Here’s how you can specify IP addresses in the whitelist:
By utilizing this format, you can easily configure your IP whitelist to include specific IP addresses or define broader ranges for access control.
To configure an IP whitelist in zendit, follow these steps:
By setting up IP whitelists, you can control which IP addresses have access to the zendit API in each environment, enhancing the security of your integration.
These whitelists will determine which IP addresses are allowed to access the zendit API in the designated environment (production or sandbox/test mode). By adding the desired IP addresses to your whitelists, you ensure that only authorized sources can interact with the zendit API, strengthening the security of your integration.
🔐 For optimal security, we highly recommend adding IP whitelists for both your test environment and production environment in zendit. While it may require some additional effort during development and testing, implementing IP whitelists adds an extra layer of protection to your integration.
By whitelisting specific IP addresses or ranges, you ensure that only authorized sources can access your zendit account and perform transactions. This helps prevent unauthorized access, potential data breaches, and the risk of fraudulent activities.
Even in a test environment, it’s crucial to protect your zendit account and data from any unauthorized usage or potential vulnerabilities. Adding IP whitelists to your test environment can help mitigate the risk of token compromises or unauthorized transactions, allowing you to focus on accurate testing and development.
Remember, a proactive approach to security can save you from unexpected issues and ensure the smooth operation of your integration.
If you don’t have a fixed IP address to whitelist or choose not to set up an IP whitelist, your zendit account can be accessed from any internet location. However, this poses a high security risk. To mitigate this risk, it is strongly recommended that you obtain a public IP address and whitelist it for your production environment.
Development done in local environments against test mode may elect to leave the IP whitelisting for the test mode environment unprotected by IP whitelists as a low risk environment since wallet balance and product fulfillment is simulated and does not carry any costs.
By whitelisting specific IP addresses, you ensure that only requests originating from that IP address are allowed to access your zendit account. This provides an additional layer of security and helps protect your account from unauthorized access.
It’s important to note that if your account is compromised and you have chosen not to set up an IP whitelist, zendit will not assume responsibility for any misuse or unauthorized activities associated with your account. Therefore, taking the necessary precautions, such as setting up an IP whitelist, is crucial to maintaining the security and integrity of your zendit integration.
Security features have been extended to the catalog.
It is possible to disable products so they are not available for sale. If a transaction passes all other security checks but the product is marked as disabled in the catalog, the transaction will be rejected for the product that is marked as disabled.
To explore the features of enabling and disabling products from sale, visit the Catalog Guide to find out more.
It is recommended to disable products you don’t intend to sell if they don’t fit your business. For example if you focus on just eSIM or just MTU products but don’t intend to sell Utility or Gift Card products, disable those products so even if your API Key is compromised and you didn’t setup IP Whitelists for your production environment, products that you don’t make available cannot be purchased via the API.

ShieldWall is a new security feature we’ve added to the Zendit platform.
When it’s implemented in an integration, transaction information will be sent to a webhook exposed by the Zendit client to verify that the transaction is legitimate. If the transaction is not recognized, the webhook can respond to zendit with an error that prevents zendit from fulfilling the transaction.
To learn about ShieldWall, visit the ShieldWall Guide to find out more about this feature and how to implement it into your environment.
It is recommended to implement the ShieldWall webhook to verify transactions before they are sent for fulfillment. Implementing this feature will block unrecognized transactions.

Integrations that choose to employ webhooks have the ability to set a header on the webhook and a value that may be used to authenticate the webhook.
The header name and value is selected by the client integrating as an additional security feature for their environment.
It is recommended to add an Authorization header requirement to your webhook and a long, encoded authentication string (not your API Key) so when results are sent to your webhook server, they can be authenticated as genuine before processing them.
It is recommended that you set a schedule for rotating the value of this header (e.g. every 90 days) to ensure that if the header authentication is compromised, illegitimate webhooks will not be processed by your webhook server.
