Optional transaction verification webhook for Zendit clients..
Skip the preamble and just get to the example code?
Whether inside your network or intruders that compromise your network, bad actors are always looking for new avenues for fraud. Zendit’s ShieldWall gives an extra layer of protection from fraud beyond IP Whitelists and access tokens.
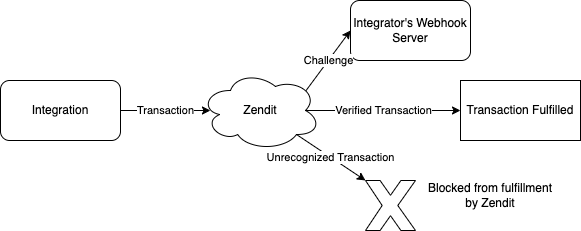
ShieldWall is an optional webhook that is sent by Zendit to your webhook server to verify if a transaction is legitimate. If the transaction is recognized, a verification is returned to Zendit from your webhook and the transaction will proceed as expected. If the transaction is not recognized, a negative acknowledgement is returned by your webhook to Zendit and we immediately fail the transaction and mark it as blocked by ShieldWall.
The transaction flow works as follows:

When implementing ShieldWall, all purchase transactions will require passing the verification step with the provided webhook. ShieldWall is expected to be lightweight enough to receive a response within 20 seconds. In the event that ShieldWall does not receive the verification within 20 seconds, the call to the webhook will time out and the transaction will be blocked as unverified. If the webhook is unreachable, all transactions that fail to be verified will automatically be blocked and a alert will be sent that transactions are blocked due to the ShieldWall webhook being unreachable. For longer outages or intermittent inability to reach ShieldWall, an hour alert will be sent if any transactions cannot get a response from the webhook.
To implement ShieldWall, a webhook that receives both HEAD and POST traffic needs to be created. The HEAD request is used by Zendit when setting up the webhook to verify connectivity can be established.
When a transaction is sent to Zendit, Zendit will POST the transaction information using the same format as the /transaction endpoint on the API (basic details) as follows:
If the transaction is recognized, the Webhook should return a status 200 response. If the transaction is not recognized, the Webhook should return a 404 response. Any status other than 200 or 404 will be treated as a webhook failure and an alert will be sent notifying that the transaction was blocked because we could not verify it against the webhook server.
To reference the transaction format, refer to the API Guide.
ShieldWall will only send alerts when the webhook is failing in the production environment. If the webhook is altered in the production environment, a security alert will be sent with a notification that the webhook has been changed.
Transactions returned as unrecognized and blocked by ShieldWall are viewable in the transaction detail report and will be noted that they were blocked by ShieldWall. Alerts are not sent for transactions that were blocked by the 404 response from the ShieldWall webhook but an excessive number of transactions blocked should be investigated on the integration for a network intrusion or internal attempts to fulfill products using the production API key. IP Whitelisting should also be investigated for tightening security.
For help with a compromised API Key, contact Zendit support at support@zendit.io.
All sample code for ShieldWall is written in TypeScript for Node.js with Express using the Zendit Node.js SDK.
import express, { Request, Response } from "express";
import { DtoTransaction, DtoTransactionFromJSON } from "@zenditplatform/zendit-sdk";

export const shieldwall = express.Router();

const bodyParser = require('body-parser');
const jsonParser = bodyParser.json();

// Used by head request to verify webhook
shieldwall.get("/webhook/shieldwall", (req: Request, res: Response): void => {
    res.send("OK");
 });

 // Called by Zendit with transaction details
 shieldwall.post("/webhook/shieldwall", jsonParser, (req: Request, res:Response): void => {
    try {
       // Check the validity of the transaction format
       const response:DtoTransaction = DtoTransactionFromJSON(req.body);
       // Process this transaction synchronously to provide a result to Zendit
       if (processWebhook(response))
         // Send status 200 if the transaction is recognized - Zendit will proceed with fulfilling the transaction
         res.sendStatus(200);
       else
         // Send status 404 if the transaction is not recognized - Zendit will mark the transaction as blocked by ShieldWall
         res.sendStatus(404);
    } catch (error) {
        // Throw a 500 error due to malformed data - Zendit will mark the transaction as blocked by ShieldWall
        console.log(error);
        res.sendStatus(500);
    }

 });

 // Process shieldwall response
 function processWebhook(content: DtoTransaction) {
    console.log(content);
    if (!content.transactionId)
       return false;

    // This example looks for "VALID" contained in the transaction ID for testing.
    // For a full implementation, customize this method to validate the transaction ID against
    // your system using the properties of the transaction.
    if (content.transactionId.indexOf("VALID") > -1)
       return true;
    else
       return false;
}To test your ShieldWall on a local developer environment, ngrok is an easy tool to create a tunnel between a test service running on a local environment with a public URL. At the free tier, a single public domain address can be setup on an ngrok account and agents are available for MacOS, Windows, Linux, FreeBSD, RaspberryPi or a docker image.
Once setup with ngrok, start your local server and the ngrok agent then simply point your Zendit ShieldWall webhook to the static domain that is assigned to your account (you can use the same domain with multiple webhooks on different endpoints of your service) and start testing transactions. Your local service will receive the webhooks via ngrok’s agent.
When ready for QA, deploy your service to a location addressable by Zendit’s public IPs and update the location of the ShieldWall webhook for your test mode environment to your QA deployment. When testing is complete, deploy your ShieldWall webhook to your production environment making sure the service is accessible from Zendit’s public IPs and put in the public endpoints for your service.
Once setup, Zendit will begin sending transactions to ShieldWall for verification before proceeding to fulfillment of a transaction.